Tag Archives: SQL Server

Introducing CLR Stored Procedures in SQL Server 2012

Contents


Introduction

This guide demonstrates how to use SQL Server Common Language Runtime (CLR) integration with SQL Server 2012. In this guide, the following two assemblies will be created using C#:

  • MathAsm
  • StoredProceduresAsm


About Common Language Runtime (CLR)

The Common Language Runtime (CLR) is the heart of the Microsoft .NET Framework and provides the execution environment for all .NET Framework code. Code that runs within the CLR is referred to as managed code. The CLR provides various functions and services required for program execution, including just-in-time (JIT) compilation, allocating and managing memory, enforcing type safety, exception handling, thread management, and security.

With the CLR hosted in Microsoft SQL Server (called CLR integration), you can author stored procedures, triggers, user-defined functions, user-defined types, and user-defined aggregates in managed code. Developers use compiled OO languages like C# or Visual Basic .NET to write code and to have the code executed as if it were a T-SQL procedure, function, or trigger. Because managed code compiles to native code prior to execution, you can achieve significant performance increases in some scenarios.

Managed code uses Code Access Security (CAS), code links, and application domains to prevent assemblies from performing certain operations. SQL Server 2005, SQL Server 2008, and SQL Server 2012 uses CAS to help secure the managed code and prevent compromise of the operating system or database server.

Enable CLR in SQL Server

In SQL Server 2005, SQL Server 2008, and SQL Server 2012, the Common Language Runtime (CLR) is off by default. In an effort to improve security, Microsoft has turned many features “off by default”. This is a big change from the old policy of turning every feature on so that developers weren’t discouraged from using the feature due to difficulties in getting the feature to work.

EXEC sp_configure 'show advanced options', '1'
Go

Configuration option 'show advanced options' changed from 0 to 1. Run the RECONFIGURE statement to install.

Reconfigure
Go

Command(s) completed successfully.

EXEC sp_configure 'clr enabled', '1'
Go

Configuration option 'clr enabled' changed from 0 to 1. Run the RECONFIGURE statement to install.

Reconfigure
Go

Command(s) completed successfully.

EXEC sp_configure 'show advanced options', '0'
Go

Configuration option 'show advanced options' changed from 1 to 0. Run the RECONFIGURE statement to install.

Reconfigure
Go

Command(s) completed successfully.

Compile and Build Assembly

In order to develop SQL CLR assemblies for SQL Server, you must have and utilize the .NET Framework 3.5 installed on your development computer. If you do not have the .NET Framework version 3.5 installed on your development computer, you must install it if you want to development SQL CLR assemblies for SQL Server. SQL Server 2005, SQL Server 2008, and SQL Server 2012 support only those assemblies that target the 2.0, 3.0, 3.5, or 4.0 version of the .NET Framework.

As mentioned in the Introduction, this guide will compile and build two assemblies using C# that will be integrated with SQL Server 2012. The source code for both assemblies is presented below.

   Math.cs

using System;
using System.Data;
using System.Data.SqlTypes;
using System.Data.SqlClient;
using Microsoft.SqlServer.Server; 

public class Math {

    [SqlFunction]
    public static SqlDouble Factorial(SqlDouble x) {
        SqlDouble y = 1.0;
        while(x > 1.0) {
            y *= x;
            x -= 1;
        }
        return y;
    }
}

   StoredProcedures.cs

using System;
using System.Data;
using System.Data.SqlTypes;
using System.Data.SqlClient;
using Microsoft.SqlServer.Server;

public class StoredProcedures {

    ///  /// Execute a command and send the resulting reader to the client /// 
    [Microsoft.SqlServer.Server.SqlProcedure]
    public static void GetVersion() {
        using (SqlConnection connection = new SqlConnection("context connection=true")) {
            connection.Open();
            SqlCommand command = new SqlCommand("select @@version", connection);
            SqlDataReader r = command.ExecuteReader();
            SqlContext.Pipe.Send(r);
        }
    }

    public const double SALES_TAX = .086;

    [SqlFunction()]
    public static SqlDouble addTax(SqlDouble originalAmount) {
        SqlDouble taxAmount = originalAmount * SALES_TAX;
        return originalAmount + taxAmount;
    }
}

Copy the source code files above to your source directory. For example:

C:\> copy C:\Users\SQLServerAdmin\Downloads\*.cs C:\Programming\c#\SQLCLRIntegrationExample\src\
C:\Users\SQLServerAdmin\Downloads\Math.cs C:\Users\SQLServerAdmin\Downloads\StoredProcedures.cs 2 file(s) copied.

There are two methods to compile the C# source code; Microsoft Visual Studio and the C# command-line compiler. This guide uses the C# command-line compiler.

To use the C# command-line compiler, navigate to the appropriate .NET Framework directory. For example:

C:\> cd C:\Windows\Microsoft.NET\Framework64\v4.0.30319

From this directory, compile the two SQL CLR source code files into an assembly (dll).

SET SRC_PATH=C:\Programming\c#\SQLCLRIntegrationExample\src
SET DLL_PATH=C:\Programming\c#\SQLCLRIntegrationExample\assemblies

csc /target:library /out:%DLL_PATH%\Math.dll %SRC_PATH%\Math.cs

Microsoft (R) Visual C# Compiler version 4.0.30319.17929 for Microsoft (R) .NET Framework 4.5 Copyright (C) Microsoft Corporation. All rights reserved.

csc /target:library /out:%DLL_PATH%\StoredProcedures.dll %SRC_PATH%\StoredProcedures.cs

Microsoft (R) Visual C# Compiler version 4.0.30319.17929 for Microsoft (R) .NET Framework 4.5 Copyright (C) Microsoft Corporation. All rights reserved.

DIR %DLL_PATH%
 Volume in drive C has no label. Volume Serial Number is DC7C-B8D3 Directory of C:\Programming\c#\SQLCLRIntegrationExample\assemblies 03/26/2013 12:13 AM <DIR> . 03/26/2013 12:13 AM <DIR> .. 03/26/2013 12:13 AM 3,584 Math.dll 03/26/2013 12:13 AM 4,096 StoredProcedures.dll 2 File(s) 7,680 bytes 2 Dir(s) 51,610,902,528 bytes free

Grant Permissions for External Access

In order to create an assembly with EXTERNAL_ACCESS (or UNSAFE) permission set, you need extra permissions in the database. This can be achieved by setting the TRUSTWORTHY bit in the database (ALTER DATABASE[DevDB]SET TRUSTWORTHY ON); however, this is not a preferred option as it can cause other undesired side effects. Note that if your assembly does not require resources outside of the database (for example, writing to a file), you do not need to assign an EXTERNAL_ACCESS permission set to the assembly in order to execute the SQL CLR in the database. You only need to assign an EXTERNAL_ACCESS permission set to the assembly when accessing resources outside of the database server.

If your assembly will need access to resources outside of the database, use the following method as the preferred alternative to setting the TRUSTWORTHY bit in the database as explained above.

  1. Create a .NET strong name key file by using the sn.exe tool.
    C:\> SET SN_TOOL="C:\Program Files (x86)\Microsoft SDKs\Windows\v7.0A\bin\NETFX 4.0 Tools\sn.exe"
    
    C:\> SET KEY_PATH="C:\Programming\c#\SQLCLRIntegrationExample\keys"
    
    C:\> %SN_TOOL% -k %KEY_PATH%\extSQLKey.snk
    
    Copyright (c) Microsoft Corporation. All rights reserved.
    
    C:\> dir %KEY_PATH%
     Volume in drive C has no label. Volume Serial Number is DC7C-B8D3 Directory of C:\Programming\c#\SQLCLRIntegrationExample\keys 03/26/2013 12:29 AM <DIR> . 03/26/2013 12:29 AM <DIR> .. 03/26/2013 12:29 AM 596 extSQLKey.snk 1 File(s) 596 bytes 2 Dir(s) 51,610,288,128 bytes free
  2. In the master database, create a master key (if one does not already exist).
    USE [Master]
    Go
    
    CREATE MASTER KEY
    ENCRYPTION BY PASSWORD = 'some_secure_password';
    
    Command(s) completed successfully.
  3. Still in master, create an asymmetric key.
    CREATE ASYMMETRIC KEY extSQLKey
    FROM FILE = 'C:\Programming\c#\SQLCLRIntegrationExample\keys\extSQLKey.snk';
    
    Command(s) completed successfully.
  4. Also in the master database, create a login from the asymmetric key.
    CREATE LOGIN extSQLLogin
    FROM ASYMMETRIC KEY extSQLKey;
    
    Command(s) completed successfully.
  5. Give the login just created EXTERNAL ACCESS ASSEMBLY permission.
    GRANT EXTERNAL ACCESS ASSEMBLY to extSQLLogin;
    
    Command(s) completed successfully.
  6. Build your assembly like before but this time sign it with your strong name key.
    cd C:\Windows\Microsoft.NET\Framework64\v4.0.30319
    
    SET SRC_PATH=C:\Programming\c#\SQLCLRIntegrationExample\src
    SET DLL_PATH=C:\Programming\c#\SQLCLRIntegrationExample\assemblies
    SET KEY_PATH=C:\Programming\c#\SQLCLRIntegrationExample\keys
    
    csc /target:library /keyfile:%KEY_PATH%\extSQLKey.snk /out:%DLL_PATH%\StoredProcedures.dll %SRC_PATH%\StoredProcedures.cs
    
    Microsoft (R) Visual C# Compiler version 4.0.30319.17929 for Microsoft (R) .NET Framework 4.5 Copyright (C) Microsoft Corporation. All rights reserved.
    
    csc /target:library /keyfile:%KEY_PATH%\extSQLKey.snk /out:%DLL_PATH%\Math.dll %SRC_PATH%\Math.cs
    
    Microsoft (R) Visual C# Compiler version 4.0.30319.17929 for Microsoft (R) .NET Framework 4.5 Copyright (C) Microsoft Corporation. All rights reserved.
    
    DIR %DLL_PATH%
     Volume in drive C has no label. Volume Serial Number is DC7C-B8D3 Directory of C:\Programming\c#\SQLCLRIntegrationExample\assemblies 03/26/2013 12:13 AM <DIR> . 03/26/2013 12:13 AM <DIR> .. 03/26/2013 01:00 AM 3,584 Math.dll 03/26/2013 01:00 AM 4,096 StoredProcedures.dll 2 File(s) 7,680 bytes 2 Dir(s) 51,609,612,288 bytes free
  7. The assembly is now ready to be deployed. The assembly is signed with a strong name key, and the strong name key has an asymmetric key created from it and there is a login created from that symmetric key with the necessary permission set.


Create Assemblies in SQL Server

With the assemblies built, the next step is to create the assembly in a SQL Server database along with the external procedure and/or function wrappers to run the assembly.

MathAsm

Use [DevDB]
Go

CREATE ASSEMBLY MathAsm FROM 'C:\Programming\c#\SQLCLRIntegrationExample\assemblies\Math.dll'
    WITH PERMISSION_SET = EXTERNAL_ACCESS;
Go

CREATE FUNCTION Factorial(@x FLOAT)
    RETURNS FLOAT
    EXTERNAL NAME MathAsm.Math.Factorial;
Go

Command(s) completed successfully.

StoredProceduresAsm

Use [DevDB]
Go

CREATE ASSEMBLY StoredProceduresAsm FROM 'C:\Programming\c#\SQLCLRIntegrationExample\assemblies\StoredProcedures.dll'
    WITH PERMISSION_SET = EXTERNAL_ACCESS;
Go

CREATE PROCEDURE GetVersion AS EXTERNAL NAME StoredProceduresAsm.StoredProcedures.GetVersion;
Go

CREATE FUNCTION addTax(@originalAmount FLOAT)
    RETURNS FLOAT
    EXTERNAL NAME StoredProceduresAsm.StoredProcedures.addTax;
Go

Command(s) completed successfully.

Note that the external reference for creating the procedure and wrapper functions is in the form:

[EXTERNAL NAME] assembly_name.class_name.method_name

Run Example Assemblies in SQL Server

With the assemblies and procedures / functions wrappers created in SQL Server, run the following T-SQL to execute the assemblies.

SELECT [DevDB].[dbo].[Factorial](5) AS "Factorial"
Go

Factorial ----------------- 120

EXEC GetVersion
Go

(No column name) ----------------------------- Microsoft SQL Server 2012 - 11.0.2100.60 (X64) Feb 10 2012 19:39:15 Copyright (c) Microsoft Corporation Business Intelligence Edition (64-bit) on Windows NT 6.2 (Build 9200: ) (Hypervisor)

SELECT [DevDB].[dbo].[addTax](10.00) AS "Original + Tax"
Go

Original + Tax ----------------------------- 10.86

Drop Assemblies from SQL Server

The following T-SQL can be used to drop the previously created objects in the example Class.

MathAsm

Use [DevDB]
Go

DROP FUNCTION [Factorial];
Go

DROP ASSEMBLY [MathAsm];
Go

Command(s) completed successfully.

StoredProceduresAsm

Use [DevDB]
Go

DROP PROCEDURE [GetVersion];
Go

DROP FUNCTION [addTax];
Go

DROP ASSEMBLY [StoredProceduresAsm];
Go

Command(s) completed successfully.

About the Author

Jeffrey Hunter is an Oracle Certified Professional, Java Development Certified Professional, Author, and an Oracle ACE. Jeff currently works as a Senior Database Administrator for The DBA Zone, Inc. located in Pittsburgh, Pennsylvania. His work includes advanced performance tuning, Java and PL/SQL programming, developing high availability solutions, capacity planning, database security, and physical / logical database design in a UNIX / Linux server environment. Jeff’s other interests include mathematical encryption theory, tutoring advanced mathematics, programming language processors (compilers and interpreters) in Java and C, LDAP, writing web-based database administration tools, and of course Linux. He has been a Sr. Database Administrator and Software Engineer for over 20 years and maintains his own website site at: http://www.iDevelopment.info. Jeff graduated from Stanislaus State University in Turlock, California, with a Bachelor’s degree in Computer Science and Mathematics.

from:http://www.idevelopment.info/data/SQLServer/DBA_tips/Programming/PROG_20.shtml

Configure SQL Server Express to allow remote tcp/ip connections on port 1433

The following article explains how to allow SQL Server Express to accept remote connections over TCP/IP for port 1433. By default, when SQL Server Express is installed it gerates a random port to listen on. In addition, SQL Server Express only listens for connection on localhost. Using the SQL Server Configuration Manager, you will need to tell SQL Server Express to use port 1433.


To allow SQL Server Express to accept remote connections, please follow these steps:

1) Log into your server through Remote Desktop Connection (instructions for connecting to your server through RDC can be found here).

2) Click Start, Programs, Microsoft SQL Server 2005/2008/2012 and select SQL Server Configuration Manager.


3) Select SQL Server Network Configuration


4) Double click on Protocols for SQLEXPRESS


5) Right click TCP/IP and select Properties

6) Scroll down to IPAll make sure TCP Dynamic Ports is blank and that TCP Port is set to 1433.

7) Click OK

8) Make sure that port: 1433 is enable on your VDS firewall (instructions for enabling firewall ports can be found here).

9) Mixed mode authentication must also be enabled for remote connections (instructions for enabling firewall ports can be found here).

10) Make sure that the SQL Browser is enabled and running.

from:http://support.webecs.com/kb/a868/how-do-i-configure-sql-server-express-to-allow-remote-tcp-ip-connections-on-port-1433.aspx

Refer:http://blog.citrix24.com/configure-sql-express-to-accept-remote-connections/

sql server 判断数据库,表,列,视图是否存在

1 判断数据库是否存在
if exists (select * from sys.databases where name = ‘数据库名’)
drop database [数据库名]

2 判断表是否存在
if exists (select * from sysobjects where id = object_id(N'[表名]’) and OBJECTPROPERTY(id, N’IsUserTable’) = 1)
drop table [表名]

3 判断存储过程是否存在
if exists (select * from sysobjects where id = object_id(N'[存储过程名]’) and OBJECTPROPERTY(id, N’IsProcedure’) = 1)
drop procedure [存储过程名]
4 判断临时表是否存在
if object_id(‘tempdb..#临时表名’) is not null
drop table #临时表名

5 判断视图是否存在

–判断是否存在’MyView52’这个试图
IF EXISTS (SELECT TABLE_NAME FROM INFORMATION_SCHEMA.VIEWS WHERE TABLE_NAME = N’MyView52′)
PRINT ‘存在’
else
PRINT ‘不存在’
6 判断函数是否存在
— 判断要创建的函数名是否存在
if exists (select * from dbo.sysobjects where id = object_id(N'[dbo].[函数名]’) and xtype in (N’FN’, N’IF’, N’TF’))
drop function [dbo].[函数名]

7 获取用户创建的对象信息

SELECT [name],[id],crdate FROM sysobjects where xtype=’U’
/*
xtype 的表示参数类型,通常包括如下这些
C = CHECK 约束
D = 默认值或 DEFAULT 约束
F = FOREIGN KEY 约束
L = 日志
FN = 标量函数
IF = 内嵌表函数
P = 存储过程
PK = PRIMARY KEY 约束(类型是 K)
RF = 复制筛选存储过程
S = 系统表
TF = 表函数
TR = 触发器
U = 用户表
UQ = UNIQUE 约束(类型是 K)
V = 视图
X = 扩展存储过程
*/

8 判断列是否存在
if exists(select * from syscolumns where id=object_id(‘表名’) and name=’列名’)
alter table 表名 drop column 列名

9 判断列是否自增列
if columnproperty(object_id(‘table’),’col’,’IsIdentity’)=1
print ‘自增列’
else
print ‘不是自增列’

SELECT * FROM sys.columns WHERE object_id=OBJECT_ID(‘表名’) AND is_identity=1

10 判断表中是否存在索引
if exists(select * from sysindexes where id=object_id(‘表名’) and name=’索引名’)
print ‘存在’
else
print ‘不存在’

11 查看数据库中对象

SELECT * FROM sys.sysobjects WHERE name=’对象名’ SELECT * FROM sys.sysobjects WHERE name=’对象名’

How to setup linked servers for SQL Server and Oracle 64 bit client

Problem We have two SQL 2005 64-bit clusters in our organization:  a four-node production cluster and a two-node dev/test cluster.  We recently migrated a database from SQL 2000 that relied on an Oracle linked server for some of it’s computations.  No big deal, right?  Install the Oracle client software and create the linked server just like in SQL 2000 right?  Be sure to repeat the process on both nodes for failover-sake, right?  Wrong.  In the case of 64-bit SQL instances we have a few extra steps we need to take to get an Oracle linked server configured and working properly.

Solution 64-bit computing is coming of age.  In most cases, our installation and configuration processes do not change from 32-bit to 64-bit: setting up logins, creating SQL Agent jobs; nothing inherently different there.  Inconsistencies do exist however.  Take for example linked servers – more specifically linked servers to Oracle databases.  In 32-bit environments we simply install the Oracle client software, create the linked server, add remote logins and move on to the next project.  In the 64-bit world the process is slightly more difficult – and in the case of one critical step it impacts any existing users on the instance!

Process Creating Oracle Linked Server on a 64-bit SQL Instance:

  • Install Oracle 10g Release 2 64-bit client software (available from Oracle website)
  • Install Oracle 10g Release 2 64-bit ODAC software (available from Oracle website)
  • Restart SQL services
  • Configure OraOLEDB.Oracle provider
  • Create linked server
  • Add remote logins for linked server

The complete process is presented below:


Step One:  Installation of the Oracle 10g Release 2 64-bit client software

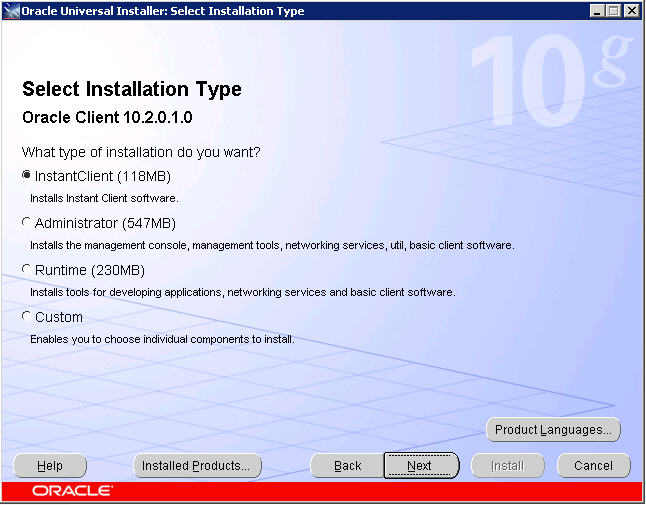
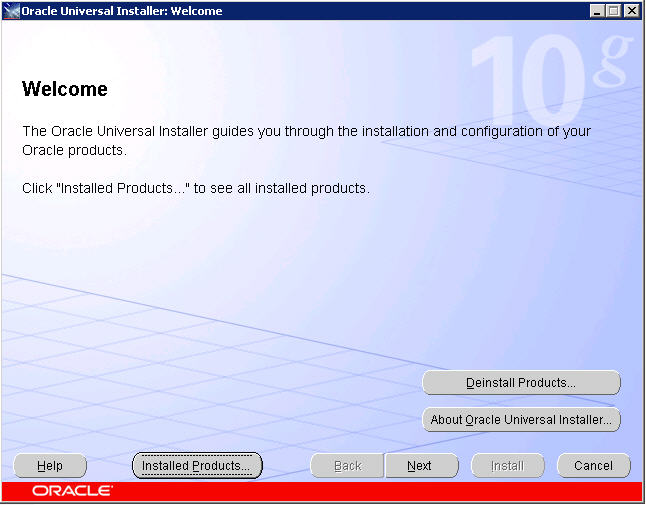
I will leave it up to you to secure the software by either download from their site or media available via any licensing agreements you may have with Oracle.  The important steps are outlined below.  You only need the barest install of the client.  Simply go ahead and select the InstantClient option from the opening dialog form and click Next.

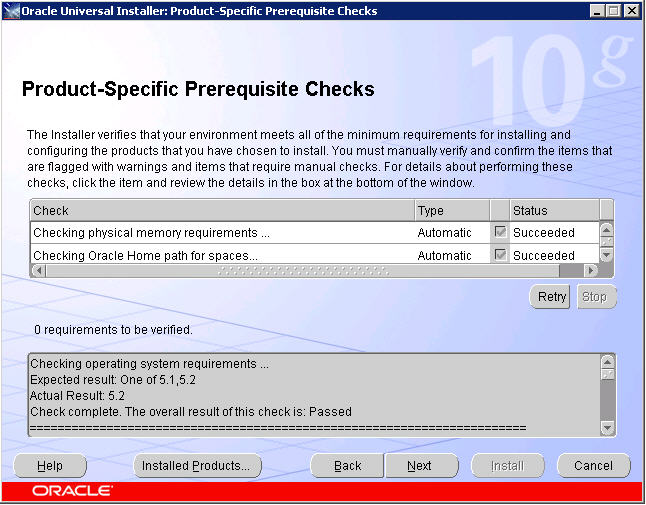
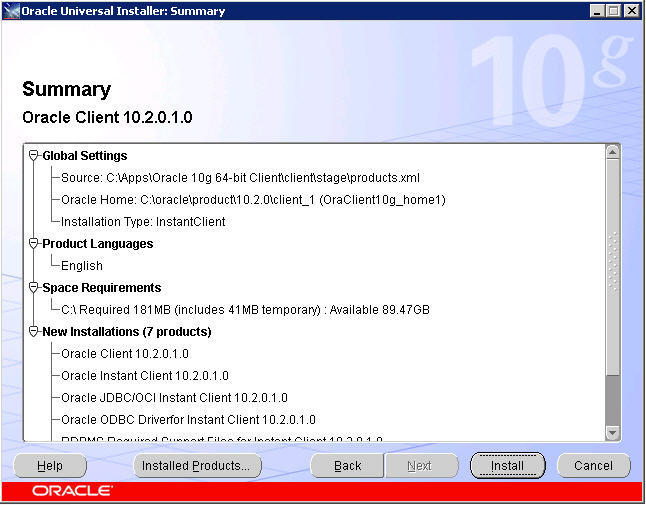
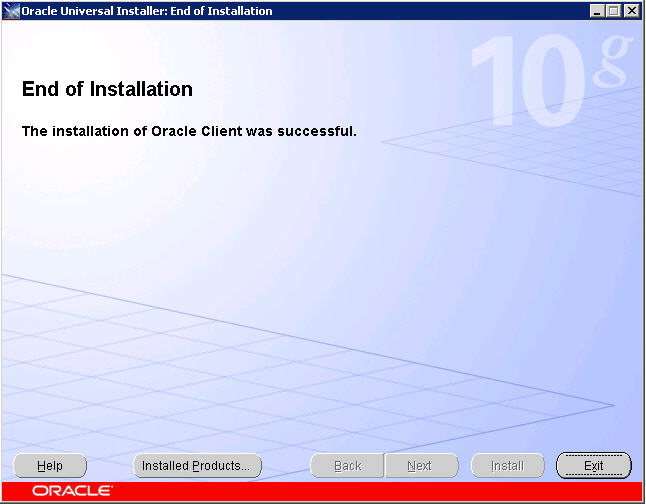
The following screens simply require you to click Next when enabled.  These are in place to present the internal checks and summaries of work to be completed once you accept the install parameters.  Proceed through the screens, click Install, and then Finish once the installation is complete.


Step Two:  Installation Oracle 10g Release 2 64-bit ODAC software

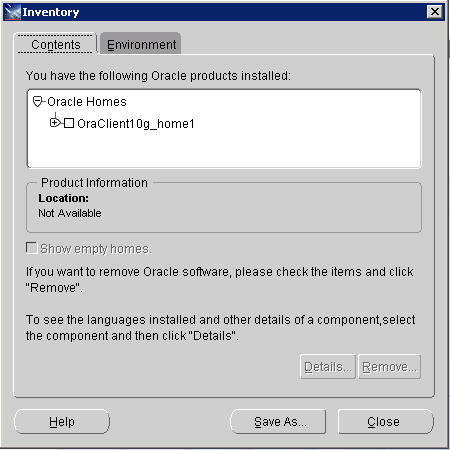
Once you have an installed 64-bit Oracle Home you can proceed with installing the ODAC drivers for a 64-bit environment.  The OraOLEDB.Oracle driver installed in this step is what you need to set up your linked server.  You’ll find the setup.exe for this installation located in the unzipped Install folder.  I strongly suggest you review your previous installation of the client software via selecting the Installed Products button.  You want to verify that you have a valid 64-bit Oracle Home that you’ll be installing against during this process.  We would not be DBAs if we were not overly cautious.  It’s quite Darwinian:  the brash and risky don’t last long as Database Administrators.

If you accepted the defaults during the client installation, your “Installed Products” Inventory should appear as follows.  If so, then close the dialog and click Next to continue.  If not, then I suggest you revisit your installation of the client software, possibly de-installing and performing all steps presented previously once again.

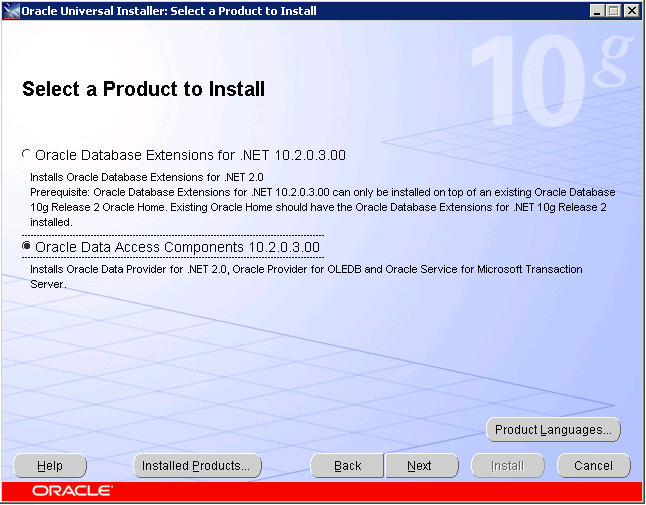
We will be installing the OraOLEDB.Oracle driver that is included in the Oracle Data Access Components option below.  Select Next to continue.

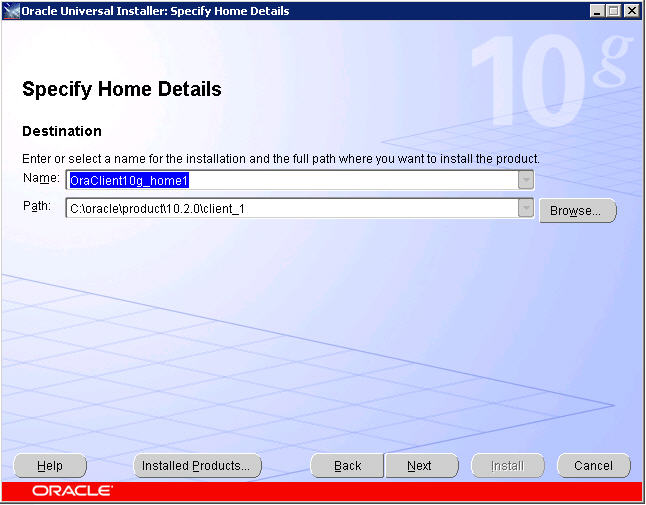
Using the drop-down box provided, select the existing Oracle Home you just verified was created as a part of your 64-bit Oracle client installation.  The Path will automatically change accordingly.  Continue by clicking Next.

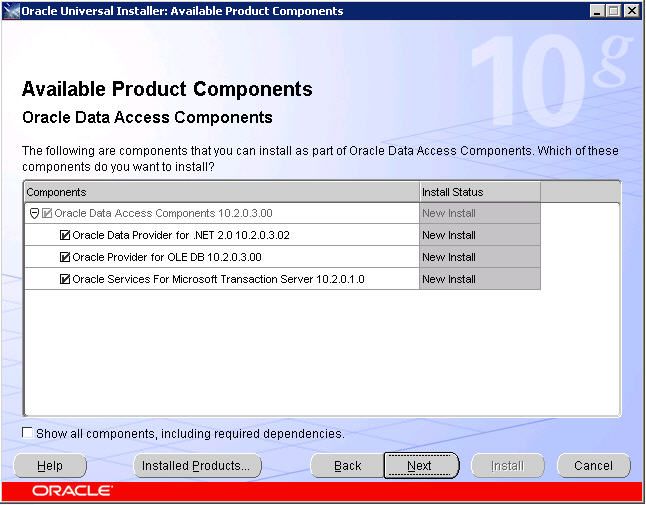
You will be presented with the following sub-components.  I’ve selected all three (you never know when these items may be useful and they are extremely lightweight) though you only really need to install the first two items.

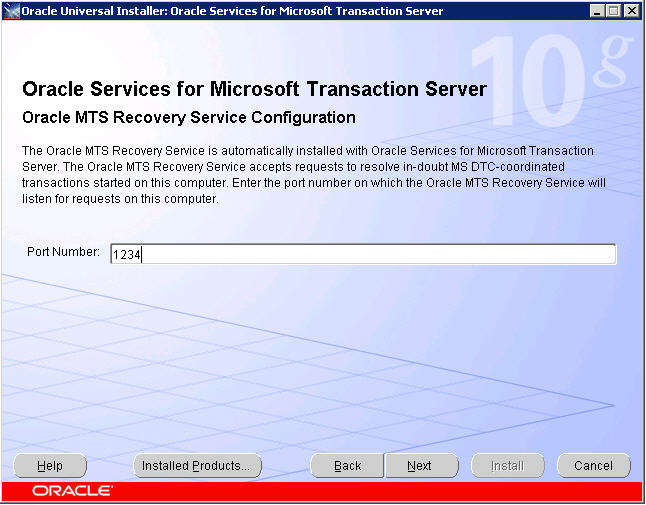
If you do decide to install the Oracle Services for Microsoft Transaction Server component, you’ll be prompted for the port number to use.  The default is 2030.

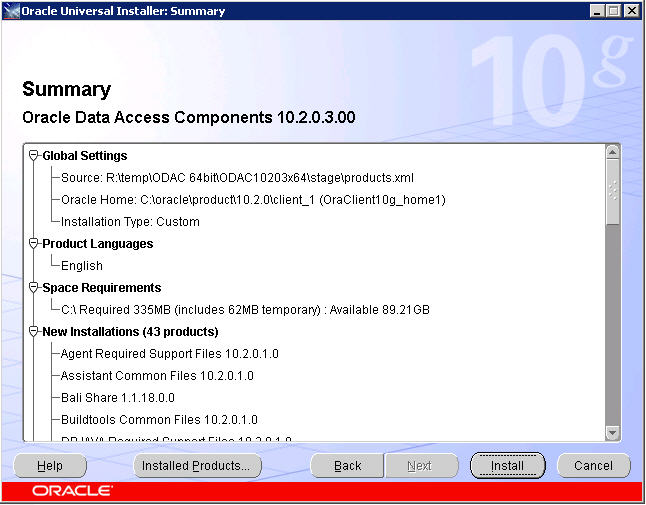
Click Next and you’ll be presented with the familiar summary screen, listing all components to be installed.  Review, make changes if necessary and then click Install.  Once completed we can move back to familiar territory:  SQL Server Management Studio.


Step Three:  Restart SQL Service

This is the most unfortunate step in the entire process.  This is usually the last thing a DBA wants to do.  It is the option of last resort whenever there is an issue on a SQL Server instance.  However, it is necessary in this case, so be sure to follow your corporate procedures for downtime notifications and process.  That being said, let’s move past this horrid step!


Step Four:  Configure OraOLEDB.Oracle provider

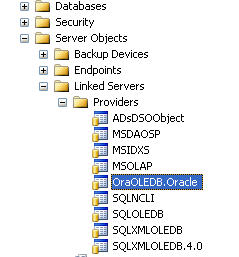
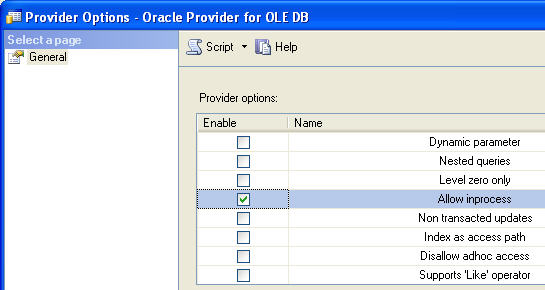
I confess.  I was not aware of this process existing until I had to do this the first time.  In Object Explorer, navigate down the tree of the SQL instance we’ve been working with until you’re able to view the list of Providers under Linked Servers.  Select OraOLEDB.Oracle and right-click.

SQL Server Management Studio.

The Provider Options dialog box appears.  Enable the “Allow inprocess” option and close the dialog.  Now ask yourself:  “Self, what did I just do?  Some Internet Guy said click this and it will work.”  Let’s take a quick look at exactly what enabling this option does for a provider.  By default, OLE DB providers are instantiated outside of the SQL Server process.  While this protects SQL from any OLE DB errors, Microsoft SQL Server requires that the OLE DB provider run in-process for handling BLOB-ish data types (text and images).


Step 5:  Create Linked Server and Add Logins

Finally, something we’re all familiar with.  The T-SQL is simple, and identical to the 32-bit platform.

--Create the Oracle Linked Server:  EXEC sp_addlinkedserver @server, @srvproduct, @provider, @datasrc
--For example: If I want to create a linked server called LK_TIPS to the ORATIPS  --database on the SRVORA1 server, listening on the default port of 1521 my query  --would look like this: EXEC sp_addlinkedserver 'LK_TIPS', 'Oracle', 'OraOLEDB.Oracle', 'SRVORA1:1521/ORATIPS'

A quick explanation about the @datasrc parameter.  Since our environment is clustered I do not like relying on an Oracle TNSname.ora file for our connection information.  It is far cleaner to specify the data source in terms of the SERVER:PORT/DB_NAME format.

As for creating an associated login the format is:

–Create the Remote Login for the Oracle Linked Server: EXEC sp_addlinkedsrvlogin @rmtsrvname, @useself, @rmtuser, @rmtpassword

Briefly, the @useself parameter determines whether the current user in connects to the linked server source under its current context or via impersonation.  By setting the value to FALSE you’re stating that you wish to connect to the linked server with a supplied login/password combination that is being identified in the @rmtuser and @rmtpassword parameters respectively.  A value of TRUE would suggest that a login will use it’s own (current) credentials to connect to the linked server.

Creating a login for the LK_TIPS linked server we just created with a login of ‘sa’ and a password set to ‘password’ would look like this:

EXEC sp_addlinkedsrvlogin ‘LK_TIPS’, ‘FALSE’, ‘sa’, ‘password’

Before you get any crazy ideas, I don’t suggest using sa/password as a combination for any system!


Next Steps

  • Tweak T-SQL code provided to fit your environment
  • If this is being configured in a cluster, be sure to install the Oracle client and ODAC components identically on all nodes in the cluster.
  • Review related tips on linked servers on MSSQLTips.com.

from:http://www.mssqltips.com/sqlservertip/1433/how-to-setup-linked-servers-for-sql-server-and-oracle-64-bit-client/

RAID的概念和RAID对于SQL性能的影响

简介

我们都听说过RAID,也经常作为SQL DBA、开发人员或构架师在工作中讨论RAID。但是,其实我们很多人都对RAID的原理,等级,以及RAID是如何影响SQL Server性能并不甚了解。

本篇文章就是为了补上这一课。


磁盘构架

今天的磁盘,和70年代45rpm(转/分钟)的唱片机很像(你还能记得吗?),仅仅是一个有着轴(磁道)旋转的媒体(面)并将数据存入称之为扇区的磁盘段。

就像唱片机那样,磁盘驱动器拥有一个摆臂来控制针(在这里可以称之为”磁头”)来访问数据。但对于磁盘来说,并不像唱片机那样只读,而是既可以读又可以写。

为了从特定的扇区读或者写数据,磁盘必须进行旋转然后摆臂移动使得磁头移动到垂直于指定扇区的正上方以访问数据。

这个过程就是基本的输入/输出操作的过程(I/O)。


IOPS

IOPS这个术语也是被经常拿出来装X的,但同样,对这个术语真正理解的人并不多。

很多人都明白IOPS是Input Output Operations per Second的缩写,但是将这个定义转换为实际的概念对于某些人就有点难了。

对IOPS基本的理解是对满足特定输入输出请求的平均时间的一种衡量。

这里重点需要知道这个度量标准是基于读取0字节的文件,这仅仅是为了统计和标准化的目的因为一个磁盘扇区大小并不同。


物理磁盘的限制

磁盘会有一些物理限制会限制磁盘能达到的IOP级别。这个限制是磁道寻址时间(seek time)和旋转延迟(rotational latency)。

磁道寻址时间是为了使得磁头可以移动到所要读的扇区,移动摆臂所花费的平均时间。

旋转延迟是为了使磁头读取盘面特定位置旋转磁盘所话费的时间(通常为毫秒级)。

单位IOP所花的时间公式如下:

单位IOP时间=磁道寻址时间+旋转延迟


所以,通过这个公式我们就可以轻松计算给定磁盘的最大IOPS。

而每秒的IOPS数字也是我们最感兴趣的,公式如下:

1秒/磁道寻址时间+旋转延迟。


我们来看如下例子:

HP 300GB 15k SAS drive(200刀)
转速 15000
平均磁道寻址时间 2.9ms
平均旋转延迟 1.83ms


我们可以用公式计算IOPS了:

IOPS = 1/(2.9ms + 1.83ms)    = 1/(4.73ms)     = 1/(0.00473)    = 211 IOPS


    我们可以看到,这个磁盘的IOPS为211(并不是很惨)。

假如我们想要节省更多的钱,我们再来看一个磁盘的例子以及和上面磁盘的区别:


HP 300GB 7200 SATA drive(100刀)
转速 7200
平均磁道寻址时间 10ms
平均旋转延迟 2.1ms


通过公式可以看到这个磁盘的最大IOPS:

IOPS = 1/(10ms + 2.1ms)    =  1/(12.1ms)         =  1/(0.0121)         = 82 IOPS


    这个7200转的磁盘的最大IOPS为82。

通过对比可以看到上面两个磁盘的性能上的巨大差异,这也不难理解为什么同样的容量价格会差这么多。

此外,文档显示如果你使用磁盘到其IOPS峰值,会产生请求队列而造成延迟(一个在SQL Server中非常邪恶的词汇,像躲避瘟疫一样躲避它)。

而我看过的大多数文档建议IOP保持在最大IOPS的80%左右。所以我们上面讨论的第一个磁盘的最大IOPS是211如果服务于超过168的IOPS就会开始显出延迟的征兆了。

现在我已经知道了单独一个磁盘可以达到的IOPS数字,那么下一件事就是要满足生产环境下的SQL Server实例需要多少IOPS?

我获取这些数据仅仅通过在生产环境下查看PerfMon工具的physical disk: Disk Transfers/Sec 计数器。

这个数字是:


驱动 平均IOPS 最大IOPS
数据和索引 2313 16,164
日志 81.5 1,127
TempDB 141 2,838


通过上面的数据看到,我们的快速磁盘仅仅能处理168的IOPS,所以结论是一个磁盘无论如何也无法满足上面的IOPS要求。

所以解决这个问题的唯一办法是使用某种机制来调整多个磁盘满足上述需求。

如果我们有100个300GB 15k SAS驱动器,我们不仅获得了30TB的存储量,还获得了16800的IOPS。

如果我们使用前面例子中较慢的磁盘,为了达到16800 IOPS,我们需要205块这样的驱动器,这使得我们需要比使用快速磁盘花更多的钱($20,000 vs $20,500),听上去很讽刺,不是吗?


RAID的必要性

现在,我们需要一堆磁盘来满足我们的速度或是容量需求,所以我们需要某种机制来将工作负载加到多个磁盘,实现这个目的的主要手段就是RAID。         RAID代表”Redundant Array <of> Inexpensive Disks”(译者注:这是最开始的定义,后来行业标准将I改为Independant,难道这是因为Inexpensive这个词妨碍了他们收取更多的钱?),RAID提供了将一堆磁盘连接起来使得逻辑上变为1个的方法。

基于你如何串联你的磁盘,RAID可以提供容错性—当磁盘阵列中有一个磁盘崩溃时数据不会丢失。

此外,因为串联了多个磁盘,我们可以消除单个磁盘的IOPS限制,更多的磁盘意味着更多的IOPS,就是这么简单。


RAID级别

RAID只为了两个目的:1)通过提高IOPS提高性能  2)提供容错。更高的容错性意味着更低的磁盘性能,同样,高性能方案也会降低容错性。

根据容错性和性能的目标配置RAID就是所谓的RAID层级。RAID是对常用的RAID阵列的一种分裂,常见的RAID级别为:RAID0,RAID1,RAID5,RAID1+0,RAID0+1。

根据你对RAID级别的选择,你需要付出所谓的”RAID代价”。某些RAID级别需要重复写入两次数据来保证容错性,但这样会牺牲性能。此外,因为重复写入数据还需要更多的磁盘空间。RAID代价会大大提高你的RAID方案的成本。

为了明白RAID对于你的系统的影响和收益,熟悉常见的RAID级别和它们的实现原理变得非常重要。


RAID 0

第一个,也是最基本的RAID级别是RAID 0.RAID 0强调为了解决IO的限制而将数据写入到磁盘阵列中。如果IO希望写100MB的数据,RAID0会将100MB数据写入到磁盘阵列的每个磁盘中。

这种方式大大减少了每个磁盘的负载,并且减少了旋转延迟(每个磁盘不再需要转和原来一样的圈数就能满足请求)。

虽然RAID0大大提高了IO性能,但没有提供任何容错措施,这意味着如果磁盘阵列中的某一块磁盘崩溃,则整个磁盘阵列中的数据全部丢失。

因为RAID0并没有提供任何容错措施,所以在生产环境中RAID0几乎不被使用。

还有一点值得注意的是,由于RAID0磁盘阵列中的每个磁盘都用于存储数据,所以没有任何磁盘空间的损失,比如使用RAID0,10个300GB的磁盘就会有3TB的可用存储空间,这意味着没有损失磁盘空间的RAID代价。


RAID 1

RAID1也被称为”镜像”,因为其通过一个镜像磁盘来保证容错性。在镜像集中的每个磁盘都会有一个镜像磁盘,RAID 1写入的每一笔数据都会分别在两个磁盘中各写一份。这意味着任何一个磁盘除了问题,另一个磁盘就会顶上。用户的角度来看并不知道出现了磁盘崩溃。

RAID 1需要付出写入时的性能代价。每个写入IOP需要运行两次,但是对于读来说却会提升性能,因为RAID控制器对于大量数据请求会从两个磁盘中读取。


RAID 5

RAID 5也被称为”Striping With Parity)”,这种方式既可以通过磁盘分割(Striping raid0)来提高性能,也可以通过奇偶性(Parity)来提供容错,当一个磁盘崩溃后,奇偶数据可以通过计算重建丢失的数据。

虽然奇偶性是实现容错的一种不错的方式。但是从磁盘写入来说代价高昂。也就是说对于每一个IOP写请求,RAID5需要4个IOPS。

为什么需要这么高写入代价的过程如下:

  •     读取原始数据(1 iop)
  •     读取当前奇偶数据(1 iop)
  •     比较当前数据和新写入请求
  •     基于数据差异计算新的奇偶值
  •     写入新数据(1 iop)
  •     写入新的奇偶值(1 iop)

RAID 1+0

    RAID 1+0 和其名字所示那样,融合了RAID 0(磁盘分割)和RAID1(镜像)。这种方式也被称为:分割镜像。

RAID 1+0 由于将数据分割到多个磁盘中使得并且不像RAID5那样有奇偶效验码,所以写入速度非常快。

但写入速度还是会有影响因为需要重复写入镜像盘,但仍然,写入速度还是非常的快。

而对于RAID 1+0 存储的代价等同于RAID1 (镜像),在RAID1+0中只有一半的磁盘空间可以用于存储数据。


RAID 0+1

RAID 0+1 和RAID1 +0 是很像,它们都是通过磁盘分割和镜像来实现目的。他们的区别更加学术化,这里我们假设他们一样。

RAID 0+1和 RAID 1+0所付出的代价是一样的。


其它RAID级别(2,3,4,6,DP等)

还有一些其它不常见的非标准RAID层级,RAID 2,3,4,6和RAID DP都和RAID5类似,他们都是通过分割和某种奇偶校验来提供性能上和容错。这些类似RAID 5的RAID层级的区别仅仅是它们如何写入奇偶数据。它们之中有些是通过保留一个磁盘来存储奇偶数据,还有一些是将奇偶数据分布到多个磁盘当中等等。如果需要,你可以去做这些研究,但对于我来说,我都称它们为”RAID 5”

还有一个值得讨论的非标准的RAID级别是RAID DP,DP的是”Dual Parity”的缩写,这和RAID 5很像但其将奇偶数据写入两次,这对于写入来说代价高昂,写入代价被提高到了6(每一次IO写请求需要6 IOPS)


RAID 比较

选择合适的RAID层级并不容易,需要考虑多方面因素:成本,性能和容量。

下表总结了每个标准RAID层级的好处和坏处。

RAID Level Fault Tolerance Read Performance Write Performance RAID Write Penalty Cost
0 None Good Excellent 1 Excellent
1 Good Good Good 2 Fair
5 Fair Good Poor 4 Good
1+0 Excellent Excellent Excellent 2 Poor
DP Good Good Terrible 6 Good


SQL存储推荐


SQL Server文件 RAID级别
操作系统和SQL二进制文件 RAID 1
数据和索引 RAID 1+0 (如果预算不允许可以使用RAID 5)
日志 RAID 1+0
TempDB RAID 1+0
备份 RAID 5


其它考虑因素

当需要计划你的IO子系统和SQL文件分布以及RAID层级时,你需要多考虑其它因素。


RAID控制器

RAID可以通过2种方式实现:软件实现和硬件实现。

在软件RAID配置中,操作系统管理RAID级别以及多磁盘之间的IO负载。

在硬件RAID配置中,物理上会有一个硬件作为RAID控制器。

通常来说,硬盘RAID解决方案会更健壮,灵活和强大。根据你对RAID控制器的预算,你能获得对应预算的配置选项。

比如,某些RAID控制器仅仅提供一个RAID层级(比如RAID5),一些更昂贵的RAID控制其提供了缓存功能。缓存可以用于缓存读取操作,写入操作以及它们两者。更好的RAID控制器甚至提供了对于读取和写入分配缓存的百分比选项。

缓存对于SQL Server来说非常重要,尤其是对于写来说。无论是何种RAID级别,都没有读取性能上的代价,所有的RAID层级都提高了读取数据的速度。而写入才是RAID的代价,你可以通过RAID缓存来缓存所有的写入操作,这极大的提高了写入性能。通常来说,有缓存的RAID控制器都带有电池,这使得即使断电,缓存的数据也不会丢失。

记住,SQL Server本身非常善于缓存读取,所以使用昂贵的RAID控制器中的缓存来缓存读取并没有什么意义。


虚拟化

还有一个值得考虑的因素是虚拟化,无论你喜欢与否,我们已经步入了虚拟化的世界。在VMWare环境下部署生产环境下的SQL Server实例变得越来越普遍。

虚拟化也影响RAID和IO方面,根据你使用的虚拟化产品,当你选择RAID级别时就需要考虑更多的因素,比如,VM是如何和存储系统交互的。

总结

很明显,我们还有一些信息没有讨论到,RAID对于SQL Server性能和容错的重要性不言而喻。

我希望本篇文章能够帮你理解RAID是如何影响你的SQL Server的性能。作为一个DBA或是数据库构架师来说,你必须明白当前RAID配置有着怎样的性能和容错性。


参考资料

MSDN:     http://msdn.microsoft.com/en-us/library/ms190764.aspx

TechNet:     http://technet.microsoft.com/en-us/library/cc966534.aspx

Ed Whalen – PerfTuning.com http://www.perftuning.com/files/pdf/RAID1.pdf


原文链接:http://www.sqlservercentral.com/articles/RAID/88945/

from:http://www.cnblogs.com/CareySon/archive/2012/05/08/HowRAIDImpactSQLServer.html