Table of Contents
Hi Folks, Its long since I am writing this for you. I have been writing technical blogs though for you but really wanted to share one tutorial which would help the database. Finally thought of starting one.
After putting my efforts with Reflection classes, I thought I could make some research on code generation. I took the CodeDom being the best alternative to generate code. Sooner or later, I found out, CodeDom actually allows you to build your assembly but it is does not allow you to dynamically compile a part of the assembly at runtime, but rather it invokes the compiler to do that. So rather than CodeDom, I thought there must be something else which fruits my needs.
Next I found out one, using Expression Trees. If you are already following me, I think you know, few days back I have already written about Expression Trees and Lamda Decomposition. So it is not a good time to recap the same. Later on, I did some research on MSIL, and found it worth learning. If you are going to grow with .NET, it would be your added advantage if you know about MSIL. Hence I started looking at the MSIL. Finally I found out a number of classes which might help you to build a Type dynamically. Let me share the entire thing with you.
Introduction
Reflection.Emit like CodeDom allows you to build your custom assembly and provides you a number of Builder classes which might be compiled during Runtime, and hence invoke DLR capabilities of C#. The library also exposes one ILGenerator which might be used later to produce the actual MSIL by putting efforts to emit Operation codes. So finally after you write your OpCodes correctly, you could easily able to compile the type dynamically during runtime. In this post, I would use ILDASM to see the IL generated from our own class, that I define, and later on I would try to build the same class dynamically.
What is Reflection?
If you are struck with Reflection, then you need to really gear yourself a bit to go further. Let me give a brief explanation of Reflection. Reflection is actually a technique to read a managed dll which are referenced or not being referenced from the application and invoke its types. In other words, it is a mechanism to discover the types and call its properties at runtime. Say for instance, you have an external dll which writes logger information and sends to the server. In that case, you have two options.
- You refer to the assembly directly and call its methods.
- You use
Reflection to load the assembly and call it using interfaces.
If you want to build really a decoupled architecture for your application, something like which could be plugged in later in the application, it is always better to choose the 2nd option. Let me clarify a bit more, say you want your customer to download the logging dll from your server and plugin to the application when needed. Believe me, there is no other alternative than using Reflection. Reflection classes allows you to load an external assembly to your application and call its types at run time.
To know more try Reflection Overview.
What is Reflection.Emit?
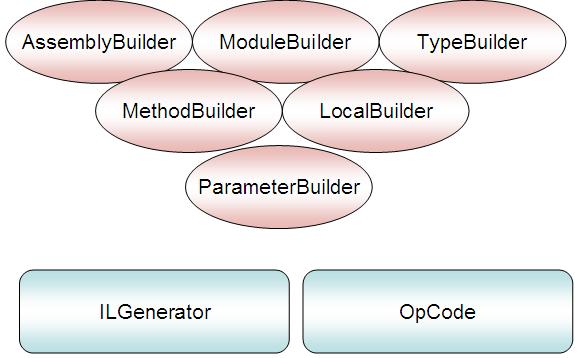
Being a part of Reflection, Reflection.Emit namespace list you a number of classes which you can use to build your type. As I have already told you, Reflection.Emit actually provides you some Builder classes like AssemblyBuilder, ModuleBuilder, ConstructorBuilder, MethodBuilder, EventBuilder, PropertyBuilder etc. which allows you to build your IL dynamically during run time. The ILGenerator provides you the capabilities to generate your IL and place the same for a method. Generally, it is very rare that a developer need these capabilities to generate an assembly at runtime, but it is great to find these capabilities present in the framework.
Now lets see what is required to build an assembly.
Steps to generate an Assembly
Now lets jump back to identify the steps to create the assembly :
- Create an Assembly in an Application Domain.
AssemblyBuilder will help you in that.
- Create a Module inside the
Assembly
- Create a number of Type inside a Module
- Add Properties, Methods, Events etc inside the Type.
- Use
ILGenerator to write inside the Properties, Methods etc.
Basically these are the common steps to create your own dynamically created Assembly.
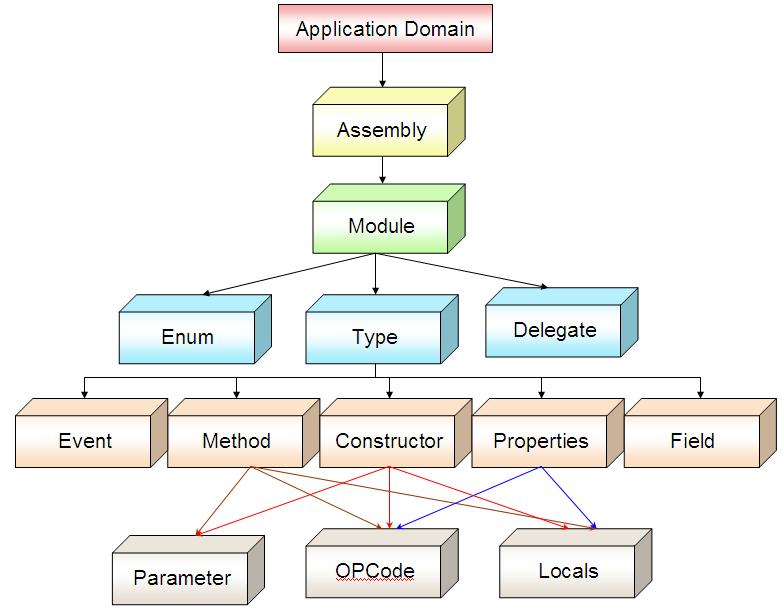
From the above figure, you can clear how the entire structure of an CLR assembly goes. The AppDomain is the root of the hierarchy which creates Assembly, then Module, and then Type. If you see the IL more thoroughly, you will understand, Delegate is also a class inherited from System.MultiCastDelegate and Struct is derived from System.ValueTypes. Each type might contain its members, and each member Method or Properties can have its OPCodes, Locals and Parameters. Locals define the local variables you define inside a method body and OpCodes are the instruction codes for the IL.
Steps to create Dynamic Assembly
Now lets go step by step with IL to build one dynamic assembly yourself.
STEP 1. Create an Assembly Dynamically
Hide Copy Code
public AssemblyBuilder GetAssemblyBuilder(string assemblyName)
{
    AssemblyName aname = new AssemblyName(assemblyName);
    AppDomain currentDomain = AppDomain.CurrentDomain; // Thread.GetDomain();     AssemblyBuilder builder = currentDomain.DefineDynamicAssembly(aname,
                               AssemblyBuilderAccess.Run);
    return builder;
}
To create an assembly you need to have the name of the assembly to uniquely identify the assembly. I have used AssemblyName class to name the assembly for us. AppDomain is the place where the Assembly will be created. This is very important, as application mght have issues while calling cross domain objects. To make it more simplistic, rather than creating a new AppDomain, I am using CurrentDomain where the program is running. Finally I have created an object of AssemblyBuilder, which eventually builds up the Assembly with unique name aname. The AssemblyBuilderAccess specifies the accessibility of the assembly to us. As I did, if you use Run, that means the assembly could only be run dynamically using Reflection, it cannot be saved for future use. Browse through each of the values to see the output.
Note : If you have defined a custom attribute for the assembly, you can easily go for SetCustomAttriburte to add your custom attribute to the assembly.
Few features of AssemblyBuilder (For further reading)
AssemblyBuilder allows you to define a number of features like :
AddResourceFile : Allows you to specify a file to be added as resource to the assembly.DefineUnmanagedResource / DefineResource : Adds one Unmanaged Resource for the assemblyEntryPoint/SetEntryPoint : A special subroutine / method to be defined which will be called automatically when the Assembly is invoked.SetCustomAttribute : Lets you specify Attributes for the assembly.DefineDynamicModule : Defines the Module for the assembly where the actual code will contain.
There are lot more flexibility while building the assembly. .NET put everything that we could have with the library and exposed methods to ensure we can do that from Reflection.Emit. You can try MSDN to read more about the methods it exposes.
STEP 2 : Create a Module
Module is a part of the object where the actual classes will remain. A module is container for all the classes we place therein. Let us create a module for us.
Hide Copy Code
public ModuleBuilder GetModule(AssemblyBuilder asmBuilder)
{
    ModuleBuilder builder = asmBuilder.DefineDynamicModule("EmitMethods",
                                           "EmitMethods.dll");
    return builder;
}
Thus the method is actually expecting a ModuleName, a unique module name and the Filename to which the assembly will be exported to.
Few useful methods
Module exposes few methods like :
DefineEnum : Lets you define an Enum, it returns back an EnumBuilder.DefineType : Lets you to define a type / class.DefineManifestResource : A dll contains a binary manifest. This method lets you define the manifest for you.DefinePInvokeMethod : Allows you to define a PInvoke method (COM) for the assembly.
STEP 3 : Create a Type
This is the main thing. To create a class, structure, delegate etc you need to define a TypeBuilder. Now from here onwards I will look into the actual IL generated using ILDASM and then produce the same output for you.
Hide Copy Code
public TypeBuilder GetType(ModuleBuilder modBuilder, string className)
{
    TypeBuilder builder = modBuilder.DefineType(className, TypeAttributes.Public);
    return builder;
}

public TypeBuilder GetType(ModuleBuilder modBuilder, string className,
                                  params string[] genericparameters)
{
    TypeBuilder builder = modBuilder.DefineType(className, TypeAttributes.Public);
    GenericTypeParameterBuilder[] genBuilders = builder.DefineGenericParameters(
                                                    genericparameters);

    foreach (GenericTypeParameterBuilder genBuilder in genBuilders)
       // We take each generic type T : class, new()     {
        genBuilder.SetGenericParameterAttributes(
                 GenericParameterAttributes.ReferenceTypeConstraint |
                              GenericParameterAttributes.DefaultConstructorConstraint);
        //genBuilder.SetInterfaceConstraints(interfaces);     }

    return builder;
}
The above GetType method has two overloads. As you can see the first one is simple one where I have just specified the name of the class and the ModuleBuilder and the method returns the TypeBuilder.
In the second overload, I have put an additional param array of string which defines each Generic type for the class. GenericTypeParameterBuilder allows you to define the GenericTypeParameter. Once you define the GenericTypeParameters and set its constraint attributes, you can the builder.
Few useful methods
Compared to classes, TypeBuilder allows you to define full fledged structure with all the options you have. Some of them are :
DefineField / DefineMethod / DefineProperties / DefineEvent : You might use these methods to generate class members.DefineMethodOverride : Allows you to override an existing method when the Type is inherited from another base typeDefineConstructor / DefineDefaultConstructor : Specifies the constructor for the current type.AddInterfaceImplementation : Allows you to implement the current type from another interface.
STEP 4 : Create Method
Method are the building block of any program. We will define a number of Methods to clear up the concepts on how easily you could build a method from IL. For the time being, lets we create a dynamic method using MethodBuilder.
Hide Shrink

Copy Code
public MethodBuilder GetMethod(TypeBuilder typBuilder, string methodName)
{
    MethodBuilder builder = typBuilder.DefineMethod(methodName,
                        MethodAttributes.Public | MethodAttributes.HideBySig);
    return builder;
}
public MethodBuilder GetMethod(TypeBuilder typBuilder, string methodName,
                      Type returnType, params Type[] parameterTypes)
{
    MethodBuilder builder = typBuilder.DefineMethod(methodName,
                      MethodAttributes.Public | MethodAttributes.HideBySig,
                             CallingConventions.HasThis, returnType, parameterTypes);
    return builder;
}

public MethodBuilder GetMethod(TypeBuilder typBuilder, string methodName,
                   Type returnType, string[] genericParameters, params Type[]
                                                                  parameterTypes)
{
    MethodBuilder builder = typBuilder.DefineMethod(methodName,
         MethodAttributes.Public | MethodAttributes.HideBySig,
                     CallingConventions.HasThis, returnType, parameterTypes);

    GenericTypeParameterBuilder[] genBuilders =
                           builder.DefineGenericParameters(genericParameters);

    foreach (GenericTypeParameterBuilder genBuilder in genBuilders)
                  // We take each generic type T : class, new()     {
        genBuilder.SetGenericParameterAttributes(
                   GenericParameterAttributes.ReferenceTypeConstraint |
                       GenericParameterAttributes.DefaultConstructorConstraint);
        //genBuilder.SetInterfaceConstraints(interfaces);     }
    return builder;
}
So the above methods will return you the MethodBuilder which lets you to define your IL code. You can see I have specified 3 overloads for this. The overloads allows you to put parameters and also to put Generic Type parameters for the methods.
Now, after building your type you need to create Locals (local variables) and use OpCode instructions.
Using ILGenerator to Emit OpCodes
To define your OpCodes you will need ILGenerator. ILGenerator allows you to Emit IL for your method body and hence lets you create the instruction set for the method that you are about to build. Let me first introduce some of the few instruction sets that helps you to add two integer variables passed into the method and return a floating value as a result.
Hide Copy Code
public void CreateMethod()
{
    AppDomain currentDomain = AppDomain.CurrentDomain;
    AssemblyBuilder asmbuilder = this.GetAssemblyBuilder("MyAssembly");
    ModuleBuilder mbuilder = this.GetModule(asmbuilder);
    TypeBuilder tbuilder = this.GetTypeBuilder(mbuilder, "MyClass");

    Type[] tparams = { typeof(System.Int32), typeof(System.Int32) };
    MethodBuilder methodSum = this.GetMethod(tbuilder, "Sum", typeof(System.Single),
                                                                 tparams);

    ILGenerator generator = methodSum.GetILGenerator();

    generator.DeclareLocal(typeof(System.Single));
    generator.Emit(OpCodes.Ldarg_1);
    generator.Emit(OpCodes.Ldarg_2);
    generator.Emit(OpCodes.Add_Ovf);
    generator.Emit(OpCodes.Conv_R4);
    generator.Emit(OpCodes.Stloc_0);

    generator.Emit(OpCodes.Ldloc_0);
    generator.Emit(OpCodes.Ret);
}
If you minutely see the above code, the code actually creates an Assembly in CurrentDomain and having a dynamically created type MyClass in it. The class hence created will contain the method Sum in it.
The lines with ILGenerator.Emit actually emits the IL to the method body Sum. Every method must declare local stack element to run its data. In IL, we declare Local variables before calling any instruction codes. Just like this, I have used DeclareLocal to declare a float32 Local in the method. The DeclareLocal method actually returns a LocalBuilder which you might use as well to manipulate the index of this variable. After we declare all the locals, we first load argument list Ldarg_1 and Ldarg_2(as first argument is implicit object this). The Add_Ovf actually adds the two loaded arguments and pass it to the local variable Stloc_0 (which represents the top element of the Stack or the Local variable we created at Index 0). Next the Ldloc_0 pops the value and returns it back to the external world.
Now here is the most easiest sample of producing your own Type. Now let me go a bit further to build a more concrete Type
A more concrete example
As we have already built our own Type, its time to give you an example in building a more concrete Type. Before we demonstrate let me show you the code which we are going to create dynamically during runtime and call its method to get the output. Please note that, I have tried to simplify the code in an extent so that it helps you to understand the code better..
Hide Shrink
Copy Code
public interface IBuilder
{
    float Sum(int firstnum, int secondnum);
    float Substract(int firstnum, int secondnum);
    float Multiply(int firstnum, int secondnum);
    float Divide(int firstnum, int secondnum);
}

public class Builder : IBuilder
{

    # region Event
    public delegate void BuilderDelegate(string message);

    public event BuilderDelegate InvokeMessage;

    public virtual void OnInvokeMessage(string message)
    {
        if (this.InvokeMessage != null)
            this.InvokeMessage(message);
    }

    # endregion

    # region Fields
    private int firstNum, secondNum;
    public int FirstNum
    {
        [DebuggerStepThrough()]
        get { return this.firstNum; }
        set { this.firstNum = value; }
    }

    [DebuggerBrowsable(DebuggerBrowsableState.Never)]
    public int SecondNum
    {
        get { return this.secondNum; }
        set { this.secondNum = value; }
    }

    # endregion

    # region Constructors
    public Builder(int firstnum, int secondnum)
    {
        this.FirstNum = firstnum;
        this.SecondNum = secondnum;
    }

    # endregion

    #region IBuilder Members

    public float Sum(int firstnum, int secondnum)
    {
        return firstnum + secondnum;
    }

    public float Substract(int firstnum, int secondnum)
    {
        return firstnum - secondnum;
    }

    public float Multiply(int firstnum, int secondnum)
    {
        return firstnum * secondnum;
    }

    public float Divide(int firstnum, int secondnum)
    {
        try
        {
            return firstnum / secondnum;
        }
        catch (DivideByZeroException ex)
        {
            Console.WriteLine("ZeroDivide exception : {0}", ex.Message);
            return 0;
        }
    }

    #endregion

    # region Methods

    public float GetProduct()
    {
        return this.Multiply(this.FirstNum, this.secondNum);
    }
    public override string ToString()
    {
        return string.Format("FirstNum : {0}, SecondNum : {1}",
                                           this.FirstNum, this.SecondNum);
    }

    # endregion

}
In the above class, I have actually declared an Interface IBuilder which later I have implemented to produce a class Builder. The class contains few methods, events, properties etc. to allow you understand each and every flexibilities you have with it.
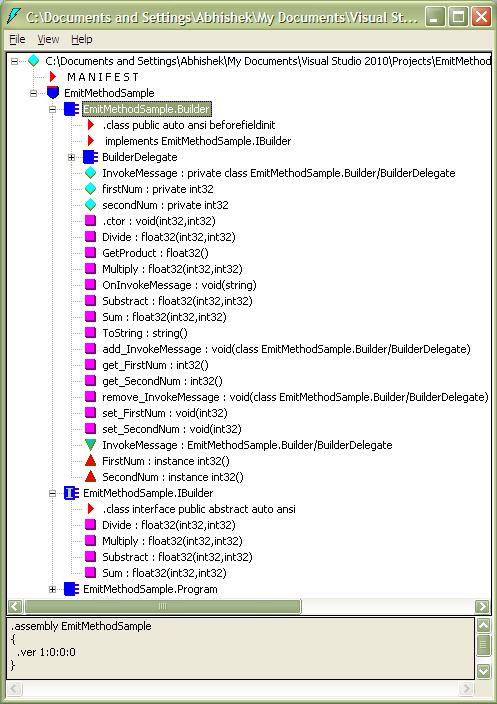
After you see the code lets open ILDASM and see how the IL looks like the picture above. Basically it contains two type .class
.class interface for IBuilder.class for Builder implementing IBuilder.
Other than that you will see another type for the Main method for my console application which you can omit for time being as we are going to concentrate on the Type.
To build a dynamic type, the most important thing that we have discussed already are Builder classes. The BCL exposes a number of Builder classes that enables us to generate MSIL code dynamically during runtime and hence you can compile the same to produce the output.
From the above figure I have put some of the most important Builder classes marked in Red. But ultimately, you need instructions to run for your application. To write your IL Expression, Reflection.Emit provides a class call ILGenerator. ILGenerator (marked in blue) enables you to write your IL for a method or property. OpCodes are Operation code that determined Computer instructions. So while writing your instructions you need to pass your OpCodes and generate the instruction set for the Method.
Now going further with our example, let me demonstrate the code one by one so that you could easily build your own Code generator.
Implement IBuilder for your Assembly
Lets move to the actual implementation of IBuilder interface. As per our discussion, IBuilder contains 4 members, Sum, Divide, Multiply & substract.
Hide Copy Code
public interface IBuilder
{
    float Sum(int firstnum, int secondnum);
    float Substract(int firstnum, int secondnum);
    float Multiply(int firstnum, int secondnum);
    float Divide(int firstnum, int secondnum);
}
So, as I am new to IL, lets use ILDASM to see what exactly the IL looks like and hence we will try to implement the same for our assembly.
Hmm… After I build and Open ILDASM to disassemble my assembly the IL it produces looks like
Hide Copy Code
.class interface public abstract auto ansi EmitMethodSample.IBuilder
{
    .method public hidebysig newslot abstract virtual
                    instance float32  Divide(int32 firstnum,
                        int32 secondnum) cil managed
    {
    }
    .method public hidebysig newslot abstract virtual
                    instance float32  Sum(int32 firstnum,
                    int32 secondnum) cil managed
    {
    }
    .method public hidebysig newslot abstract virtual
                    instance float32  Multiply(int32 firstnum,
                        int32 secondnum) cil managed
    {
    }
    .method public hidebysig newslot abstract virtual
                    instance float32  Substract(int32 firstnum,
                        int32 secondnum) cil managed
    {
    }

}
Let me explain the IL a bit.
- In MSIL any type is defined with .class, hence our Type IBuilder gets one .class for it.
- interface, abstract keyword identifies the Type to be abstract and hence you cannot create object of the same.
- Auto specifies the
LPSTR(Long Pointer to string) interpreted automatically.
- Ansi specifies the
LPSTR(Long Pointer to String) interpreted as ANSI.
- Methods in IBuilder is identified using .method keyword.
- Because of being member of an interface, the methods appear as abstract virtual.
- instance keyword specifies the object to be non-static
hidebysig specifies the method can be hidden by both name and signature. Any normal method you define gets this flexibility in .NET.NewSlot makes the member to get a slot in vtable. (A vtable is the memory area for the whole object. So whenever an object is created, a vtable is created each for each object and any object created within it gets an entry of vtable. The first member being the hidden pointer can be used to find members of the vtable)- cil managed is used to determine that the method is implemented in managed environment.
Now as you now understand the IL generated by the Interface, its time to get through to create the Type IBuilder. Lets build the code for it :
Hide Shrink
Copy Code
private Type CreateIBuilder(ModuleBuilder mbuilder)
{

    TypeBuilder tbuilder = mbuilder.DefineType("IBuilder", TypeAttributes.Interface |
        TypeAttributes.Public |
        TypeAttributes.Abstract |
        TypeAttributes.AutoClass |
        TypeAttributes.AnsiClass);

    //Define Divide
    Type[] tparams = { typeof(System.Int32), typeof(System.Int32) };
    MethodBuilder metDivide = tbuilder.DefineMethod("Divide", MethodAttributes.Public |
        MethodAttributes.Abstract |
        MethodAttributes.Virtual |
        MethodAttributes.HideBySig |
        MethodAttributes.NewSlot,
        CallingConventions.HasThis,
        typeof(System.Single), tparams);
    metDivide.SetImplementationFlags(MethodImplAttributes.Managed);

    MethodBuilder metSum = tbuilder.DefineMethod("Sum", MethodAttributes.Public |
        MethodAttributes.Abstract |
        MethodAttributes.Virtual |
        MethodAttributes.HideBySig |
        MethodAttributes.NewSlot,
        CallingConventions.HasThis,
        typeof(System.Single), tparams);
    metSum.SetImplementationFlags(MethodImplAttributes.Managed);

    MethodBuilder metMultiply = tbuilder.DefineMethod("Multiply",
        MethodAttributes.Public |
        MethodAttributes.Abstract |
        MethodAttributes.Virtual |
        MethodAttributes.HideBySig |
        MethodAttributes.NewSlot,
        CallingConventions.HasThis,
        typeof(System.Single), tparams);
    metMultiply.SetImplementationFlags(MethodImplAttributes.Managed);

    MethodBuilder metSubstract = tbuilder.DefineMethod("Substract",
        MethodAttributes.Public |
        MethodAttributes.Abstract |
        MethodAttributes.Virtual |
        MethodAttributes.HideBySig |
        MethodAttributes.NewSlot,
        CallingConventions.HasThis,
        typeof(System.Single), tparams);
    metSubstract.SetImplementationFlags(MethodImplAttributes.Managed);

    Type tIBuilder = tbuilder.CreateType();

    return tIBuilder;
}
In the above code we first create the TypeBuilder from ModuleBuilder.DefineType. You should note, I have added the TypeAttributes in the same way as it was in MSIL. After we create the TypeBuilder, we can next add up the methods. The DefineMethod method helps in building the methods as we define the MethodAttributes correctly. CallingConvensions.HasThis will make the method as instance method.. We also need to mention the ReturnType and argument types specifically. In this case I have specified the ReturnType as System.Single(float) and arguments as integers for our code. It should be noted, we need to use SetImplementationFlags to specify the methods to be cil managed.
So as our IBuilder interface is ready, its time to build our actual Type.
Implementing the Builder Class
Hmm, now its time to go final workaround with this. First I will create the basic class with methods only required to implement the interface IBuilder, later on we will add the delegate, event, a new method, a static method etc.
To create the basic Builder class, the first thing that we need is a Constructor. But as our constructor also adds few lines to initialize properties FirstNum and SecondNum, let me define them first.
1. Implementing the Type
In IL most of the type is .class, as the whole body depends on the Type header, it is good to start with by building the Type signature. In terms of IL, as in ILDASM it looks like:
Hide Copy Code
.class public auto ansi beforefieldinit EmitMethodSample.Builder
    extends [mscorlib]System.Object
    implements EmitMethodSample.IBuilder
{
}
So basically the class extends System.Object (as for any class which does not inherit form other class) and in our case it implements IBuilder.
I guess, building the type using TypeBuilder should be easy for you, let me build it again for you :
Hide Copy Code
Type[] interfaces = { parentBuilder };
TypeBuilder tbuilder = mbuilder.DefineType("Builder", TypeAttributes.Public |
    TypeAttributes.AutoClass |
    TypeAttributes.AnsiClass |
    TypeAttributes.BeforeFieldInit,
    typeof(System.Object),
    interfaces);
So here in the code I have implemented the Builder from parentBuilder which is the Type object of IBuilder interface. If you focus on the code, you will see I have specified BeforeFieldInit for the type, which means you can call the static members without initializing the object. I have also implemented the Type from System.Object according to IL.
2. Implementing the Field & Properties
As our type is ready now, let us add some field and properties on the Type. As shown in the Builder Type we have two fields to store numeric values each of which is wrapped around using property wrappers. Lets see what exactly I am talking about :
Hide Copy Code
private int firstNum, secondNum;
public int FirstNum
{
    get { return this.firstNum; }
    set { this.firstNum = value; }
}

public int SecondNum
{
    get { return this.secondNum; }
    set { this.secondNum = value; }
}
So FirstNum and SecondNum are the two Properties that we need to declare for our type. Now if you look back for the IL implementation, it looks like :
Hide Shrink
Copy Code
.field private int32 firstNum
.property instance int32 FirstNum()
{
    .set instance void EmitMethodSample.Builder::set_FirstNum(int32)
    .get instance int32 EmitMethodSample.Builder::get_FirstNum()
}
.method public hidebysig specialname instance int32
        get_FirstNum() cil managed
{
    .custom instance void
         [mscorlib]System.Diagnostics.DebuggerStepThroughAttribute::.ctor() =
                                                             ( 01 00 00 00 )
    // Code size 12 (0xc)     .maxstack  1
    .locals init (int32 V_0)
    IL_0000:  nop
    IL_0001:  ldarg.0
    IL_0002:  ldfld      int32 EmitMethodSample.Builder::firstNum
    IL_0007:  stloc.0
    IL_0008:  br.s       IL_000a
    IL_000a:  ldloc.0
    IL_000b:  ret
}
.method public hidebysig specialname instance void
        set_FirstNum(int32 'value') cil managed
{
    // Code size 9 (0x9)     .maxstack  8
    IL_0000:  nop
    IL_0001:  ldarg.0
    IL_0002:  ldarg.1
    IL_0003:  stfld      int32 EmitMethodSample.Builder::firstNum
    IL_0008:  ret
}
So considering the IL, property seems to be a wrapper for two methods one with get_PropertyName and another with set_PropertyName where get_PropertyName returns the value and set_PropertyName sets the value. So according to IL defination if you are going to implement the code it will look like :
Hide Copy Code
FieldBuilder fFirst = tbuilder.DefineField("firstNum", typeof(System.Int32),
   FieldAttributes.Private);
PropertyBuilder pFirst = tbuilder.DefineProperty("FirstNum",
        PropertyAttributes.HasDefault, typeof(System.Int32), null);
//Getter MethodBuilder mFirstGet = tbuilder.DefineMethod("get_FirstNum", MethodAttributes.Public |
    MethodAttributes.SpecialName |
    MethodAttributes.HideBySig, typeof(System.Int32), Type.EmptyTypes);
ILGenerator firstGetIL = mFirstGet.GetILGenerator();

firstGetIL.Emit(OpCodes.Ldarg_0);
firstGetIL.Emit(OpCodes.Ldfld, fFirst);
firstGetIL.Emit(OpCodes.Ret);

//Setter MethodBuilder mFirstSet = tbuilder.DefineMethod("set_FirstNum", MethodAttributes.Public |
    MethodAttributes.SpecialName |
    MethodAttributes.HideBySig, null, new Type[] { typeof(System.Int32) });

ILGenerator firstSetIL = mFirstSet.GetILGenerator();

firstSetIL.Emit(OpCodes.Ldarg_0);
firstSetIL.Emit(OpCodes.Ldarg_1);
firstSetIL.Emit(OpCodes.Stfld, fFirst);
firstSetIL.Emit(OpCodes.Ret);

pFirst.SetGetMethod(mFirstGet);
pFirst.SetSetMethod(mFirstSet);
Ohh, its huge…. .Yes, let me explain. First I have added a Field firstNum which is a numeric private variable. A FieldBuilder helps you to add a field into the IL. To define a property you need to first define the property itself and then you have to define two methods one for Getter and one for Setter such that the Getter returns System.Int32 and the Setter takes System.Int32 as argument.
The OpCodes provide the entire expression set. ldarg loads the argument and Ldfld and Stfld loads and sets the fields into the field fFirst.
A Nice thing to talk in this regard
So you must understand now, a property actually reserves the methods with get_Property and set_Property with the same signature. Say for instance you define a class with the following :
Hide Copy Code
private string first;
public string First { get { return this.first; } set { this.first = value; } }

public string get_First()
{
    return this.first;
}
public void set_First(string value)
{
    this.first = value;
}
The class will not compile, as get_First and set_First is already reserved and the compiler throws warning doing this.

Isn’t it interesting to know ?
3. Implementing the Constructor
If your class does not define a constructor in it, the C# compiler automatically puts in a default constructor for you. How it does? Actually for any class, the default constructor for System.Object is automatically inherited to the object and hence you do not need to define a default constructor in such case. It will be written in IL only when you define the default constructor explicitly.
In our case, I have explicit declaration of a parametrized constructor, as it is good to show you the code for that.
Hide Copy Code
public Builder(int firstnum, int secondnum)
{
    this.FirstNum = firstnum;
    this.SecondNum = secondnum;
}
To do this let me quickly show you how the constructor looks like in terms of IL.
Hide Copy Code
.method public hidebysig specialname rtspecialname
        instance void  .ctor(int32 firstnum,
                int32 secondnum) cil managed
{
    // Code size 26 (0x1a)     .maxstack  8
    IL_0000:  ldarg.0
    IL_0001:  call       instance void [mscorlib]System.Object::.ctor()
    IL_0006:  nop
    IL_0007:  nop
    IL_0008:  ldarg.0
    IL_0009:  ldarg.1
    IL_000a:  call       instance void EmitMethodSample.Builder::set_FirstNum(int32)
    IL_000f:  nop
    IL_0010:  ldarg.0
    IL_0011:  ldarg.2
    IL_0012:  call       instance void EmitMethodSample.Builder::set_SecondNum(int32)
    IL_0017:  nop
    IL_0018:  nop
    IL_0019:  ret
}
To build a constructor, we need to create object of ConstructorBuilder which you can get from DefineConstructor method of TypeBuilder. If you see the IL, you can see, the IL actually calls the constructor of System.Object first. This is needed, as any object internally inherited from Base System.Object.
The setFirstNum and set_SecondNum is called from the IL to set the values for FirstNum and SecondNum of the class.
Hide Copy Code
Type[] parameters = { typeof(System.Int32), typeof(System.Int32) };
ConstructorBuilder cBuilder = tbuilder.DefineConstructor(MethodAttributes.Public |
    MethodAttributes.HideBySig |
    MethodAttributes.SpecialName |
    MethodAttributes.RTSpecialName,
    CallingConventions.Standard,
    parameters);

ConstructorInfo conObj = typeof(object).GetConstructor(new Type[0]);

ILGenerator cil = cBuilder.GetILGenerator();
cil.Emit(OpCodes.Ldarg_0);
cil.Emit(OpCodes.Call, conObj);
cil.Emit(OpCodes.Nop);
cil.Emit(OpCodes.Nop);
cil.Emit(OpCodes.Ldarg_0);
cil.Emit(OpCodes.Ldarg_1);
cil.Emit(OpCodes.Call, mFirstSet);
cil.Emit(OpCodes.Nop);
cil.Emit(OpCodes.Ldarg_0);
cil.Emit(OpCodes.Ldarg_1);
cil.Emit(OpCodes.Call, mSecondSet);
cil.Emit(OpCodes.Nop);
cil.Emit(OpCodes.Nop);
cil.Emit(OpCodes.Ret);
The SpecialName in MethodAttribute for Constructor lets the method to be special to CLR. Hence the name of the method ctor makes it a constructor of the class.
To call the constructor of System.Object, we need to fetch the constructor of the object. I have used Reflection to get ConstructorInfo from Type and passed in to Call OpCode. We emit the code as specified in the IL and hence the constructor will be generated.
An Interesting thing to remember
One interesting thing to remember about Reflection.Emit is that, it internally sends a hidden object to every method it calls. This is the implicit object call which we identify as “this” in C# or “Me” in Vb. Thus when we call Ldarg_0 for OpCodes, we are actually mentioning to the implicit object passed into the constructor as first argument. So any parameter we specify starts with Index 1.
The only difference between the Constructor and a normal method is that, a Constructor does not return a value. In CLR, a method actually returns the top element in the stack immediately if OpCodes.Ret is received. So if your stack loads a value into stack before calling Ret, you will get “Invalid Program” exception when you create object of the type. So in such cases Nop should be invoked before calling Ret to consume a processing cycle.
Now that we have defined the constructor let me move forward to define the methods.
4. Implementing the Methods from IBuilder
Now as our constructor is ready, its time to implement the IBuilder object and define the Methods for us. As we are going through with code, I think it must be clear to you how to build your own custom objects. Lets try out the Divide method of IBuilder and implement the same for us.
The Divide method that we have declared earlier looks like
Hide Copy Code
public float Divide(int firstnum, int secondnum)
{
    try
    {
        return firstnum / secondnum;
    }
    catch (DivideByZeroException ex)
    {
        Console.WriteLine("ZeroDivide exception : {0}", ex.Message);
        return 0;
    }
}
So basically from this method, you can understand how you could call an external member function from an object like what I have done using Console.WriteLine here, and also lets you understand how you could use try/Catch block during your Code generation. So, without wasting time, lets Open up ILDASM again and see how different the code looks like
Hide Shrink
Copy Code
.method public hidebysig newslot virtual final
            instance float32  Divide(int32 firstnum,
                        int32 secondnum) cil managed
    {
        // Code size 39 (0x27)         .maxstack  2
        .locals init (class [mscorlib]System.DivideByZeroException V_0,
                float32 V_1)
        IL_0000:  nop
        .try
        {
        IL_0001:  nop
        IL_0002:  ldarg.1
        IL_0003:  ldarg.2
        IL_0004:  div
        IL_0005:  conv.r4
        IL_0006:  stloc.1
        IL_0007:  leave.s    IL_0024
        }  // end .try         catch [mscorlib]System.DivideByZeroException
        {
        IL_0009:  stloc.0
        IL_000a:  nop
        IL_000b:  ldstr      "ZeroDivide exception : {0}"
        IL_0010:  ldloc.0
        IL_0011:  callvirt   instance string [mscorlib]System.Exception::get_Message()
        IL_0016:  call       void [mscorlib]System.Console::WriteLine(string,
                                                                        object)
        IL_001b:  nop
        IL_001c:  ldc.r4     0.0
        IL_0021:  stloc.1
        IL_0022:  leave.s    IL_0024
        }  // end handler         IL_0024:  nop
        IL_0025:  ldloc.1
        IL_0026:  ret
    }
Now the implmentation states that the method loads 1st and 2nd argument and use Div operation to divide the values and Conv.r4 actually converts the result to float32 value. The Local stack element declared as float32 is used here and the converted result is pushed back to the stack again using stloc.1. If everything works fine, the applicaion passes its control to IL_0024 resulting the method to return the local stack value in 1st position.
So let us implement the same using Builder objects
Hide Shrink
Copy Code
MethodBuilder mDivide = tbuilder.DefineMethod("Divide", MethodAttributes.Public |
    MethodAttributes.HideBySig |
    MethodAttributes.NewSlot |
    MethodAttributes.Virtual |
    MethodAttributes.Final,
    CallingConventions.Standard,
    typeof(System.Single),
    new Type[] { typeof(System.Int32), typeof(System.Int32) });
mDivide.SetImplementationFlags(MethodImplAttributes.Managed);
ILGenerator dil = mDivide.GetILGenerator();

dil.Emit(OpCodes.Nop);
Label lblTry = dil.BeginExceptionBlock();

dil.Emit(OpCodes.Nop);
dil.Emit(OpCodes.Ldarg_1);
dil.Emit(OpCodes.Ldarg_2);
dil.Emit(OpCodes.Div);
dil.Emit(OpCodes.Conv_R4); // Converts to Float32
dil.Emit(OpCodes.Stloc_1);
dil.Emit(OpCodes.Leave, lblTry);

dil.BeginCatchBlock(typeof(DivideByZeroException));
dil.Emit(OpCodes.Stloc_0);
dil.Emit(OpCodes.Nop);
dil.Emit(OpCodes.Ldstr, "ZeroDivide exception : {0}");
dil.Emit(OpCodes.Ldloc_0);
MethodInfo minfo = typeof(DivideByZeroException).GetMethod("get_Message");
dil.Emit(OpCodes.Callvirt, minfo);
MethodInfo wl = typeof(System.Console).GetMethod("WriteLine", new Type[]
                                      { typeof(string), typeof(object) });
dil.Emit(OpCodes.Call, wl);
dil.Emit(OpCodes.Nop);
dil.Emit(OpCodes.Ldc_R4, 0.0);
dil.Emit(OpCodes.Stloc_1);
dil.Emit(OpCodes.Leave_S, lblTry);

dil.EndExceptionBlock();
dil.Emit(OpCodes.Nop);
dil.Emit(OpCodes.Ldloc_1);
dil.Emit(OpCodes.Ret);
To open a Try block in IL, you need to use BeginExceptionBlock. Be sure to store the Label so that you could move to specific IL instruction code whenever required. Now Before starting the Catch block which is notified using BeginCatchBlock we need to Leave the Try block using OpCodes.Leave with the LabelName. This will ensure that the application maintains Scope.
You can see, we could have more than one catch block, and each of them will be identified by the Type passed into BeginCatchBlock. Hence, we just Load the string inside Catch block and call the Method WriteLine of Console to show the string. Finally, again before calling EndExceptionBlock, we leave the Try/catch block.
You should note, whenever you are about to call a method, you need to use a MethodInfo object.
Building a Delegate
As it is easy to create the other methods for your Type, lets move further to create a Delegate for you. It would be a good idea to show you how to build a Delegate for a class. Building a delegate differs from building other members. Lets say we need to declare a delegate for our Type as :
Hide Copy Code
public delegate void BuilderDelegate(string message);
Now after seeing the one liners, dont think that the declaration of IL would be as simple as this. The IL looks like :
Hide Copy Code
.class auto ansi sealed nested public BuilderDelegate
    extends [mscorlib]System.MulticastDelegate
{
    .method public hidebysig specialname rtspecialname
        instance void  .ctor(object 'object',
                        native int 'method') runtime managed
    {
    }
    .method public hidebysig newslot virtual
        instance class [mscorlib]System.IAsyncResult
        BeginInvoke(string message,
            class [mscorlib]System.AsyncCallback callback,
            object 'object') runtime managed
    {
    }
    .method public hidebysig newslot virtual
        instance void  EndInvoke(class [mscorlib]System.IAsyncResult result)
                                                               runtime managed
    {
    }
    .method public hidebysig newslot virtual
        instance void  Invoke(string message) runtime managed
    {
    }
}
Oh my god, a delegate is actually defined as a nested Type (.class) inherited from System.MulticastDelegate inside the actual Type Builder. It also declares methods like Invoke, BeginEnvoke and EndEnvoke inside the new Type declaration. So lets Build the Type to help you in this even though I think you can create this yourself now.
Hide Copy Code
TypeBuilder tdelegate = tbuilder.DefineNestedType("", TypeAttributes.AutoClass |
    TypeAttributes.AnsiClass |
    TypeAttributes.Sealed |
    TypeAttributes.Public, typeof(System.MulticastDelegate));

MethodBuilder methodBeginInvoke = tdelegate.DefineMethod("BeginInvoke",
    MethodAttributes.Public |
    MethodAttributes.HideBySig |
    MethodAttributes.NewSlot |
    MethodAttributes.Virtual,
    typeof(IAsyncResult), new Type[] { typeof(string), typeof(AsyncCallback),
      typeof(object) });
methodBeginInvoke.SetImplementationFlags(MethodImplAttributes.Runtime |
MethodImplAttributes.Managed);

MethodBuilder methodEndInvoke = tdelegate.DefineMethod("EndInvoke",
 MethodAttributes.Public |
    MethodAttributes.HideBySig |
    MethodAttributes.NewSlot |
    MethodAttributes.Virtual,null, new Type[] { typeof(IAsyncResult)});
methodEndInvoke.SetImplementationFlags(MethodImplAttributes.Runtime |
 MethodImplAttributes.Managed);

MethodBuilder methodInvoke = tdelegate.DefineMethod("Invoke", MethodAttributes.Public |
    MethodAttributes.HideBySig |
    MethodAttributes.NewSlot | MethodAttributes.Virtual, CallingConventions.Standard,
                   null, new Type[] { typeof(string) });
Now moving further, I would recommend you to try out other methods too, you can try using EventBuilder class to build events, CustomAttributeBuilder to build your own user defined Custom Attributes etc.
Wrapping up the Whole thing
Now after we have implemented all the methods, let me check whether I have correctly produced the IL or not.
Hide Copy Code
//Step 1 : Create the Assembly AssemblyBuilder asmBuilder = this.GetAssemblyBuilder("MyBuilder");

//Step 2: Add A Module to the Assembly ModuleBuilder mbuilder = this.GetModule(asmBuilder);

//Step 3: Add the Type IBuilder Type iBuilder = this.CreateIBuilder(mbuilder);

//Step 4 : Implement IBuilder to create Builder Type Builder = this.CreateBuilderImpl(mbuilder, iBuilder);

dynamic variable = Activator.CreateInstance(Builder, new object[] { 20, 10 });
float result = variable.Sum(30, 40);
Console.WriteLine("Result for Sum(30, 40) : {0}", result);
result = variable.Substract(50, 25);
Console.WriteLine("Result for Substract(50, 25) : {0}", result);
result = variable.Multiply(3, 5);
Console.WriteLine("Result for Multiply(3, 5) : {0}", result);
result = variable.Divide(30, 5);
Console.WriteLine("Result for Divide(30, 5) : {0}", result);
You should note, I have used dynamic to avoid unnecessary usage of Reflection classes again.
So it looks fine and after I compile I get output like
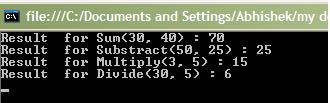
So the IL generated works great for us. You can also save the IL as Assembly using
Hide Copy Code
asmBuilder.Save("MyBuilder.dll");
Dealing with Bad IL
While building your IL, you may often come accross a situation that your IL does not compile.
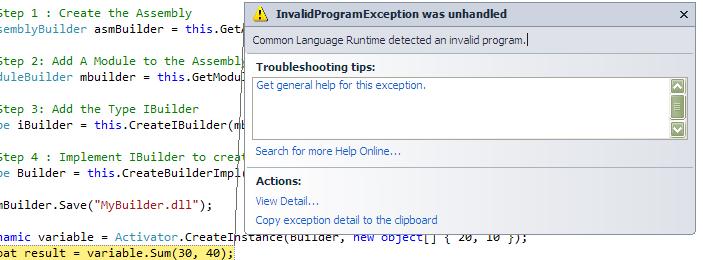
Never worry, .NET comes with a free tool which gets installed with your Visual Studio will help you rescue from these scenarios. The common type of exception that takes place is “Common Language Runtime detected an invalid program”. The tool is named as PeVerify.exe.
Once you install the Visual Studio, you can open console and try invoking the following statement
peverify.exe <assemblypath>\yourassembly.dll After it compiles the assembly again, it will give you the actual exception that took place while building the Type. You can read more about PEVerify from : MSDN Reference for PEVerify [^]
References
There are quite a number of references over internet which might help you in this topic. Lets enumerate them for you
History
Initial Post – 26th October 2010
Conclusion
Its fun creating the article for you. Even I am excited to put this effort to write one article for you. Its all new to me as well, but I tried my level best to put as many as I can. I hope you would appreciate my post.
If you think I did any mistake, please let me know, as I am no masterpiece in this, so that we could make this article better. Thank you for reading the article.
License
This article, along with any associated source code and files, is licensed under The Code Project Open License (CPOL)
from:http://www.codeproject.com/Articles/121568/Dynamic-Type-Using-Reflection-Emit